After I finished her chanfron, I decided I liked the pattern so well that I used the same type of layout for her leg guards. While Antiope's horse didn't have leg guards, I kinda felt like Skeeter needed them. I really felt like she needed them after I realized how much I loved her face guard.
Skeets has been a rock star with me doing weird things to her. As with everything else, I was kind of flying by the seat of my pants and trying stuff just to see if it would work. I'd intended to make a proper pattern for her leg guards by covering her lower legs with plastic wrap, then using painter's tape over it to draw the pattern on, then cut it off, take it inside and make the pattern from there.
My head was spinning trying to keep all of the steps in order and wondering if she'd stand nicely for all of that. In the middle of the night, it dawned on me that I could just try to use one of the pre-cut sheets of foam I had and wrap it around her leg. Much, much better idea. I took one of the sheets, wrapped it around her leg and decided it was going to be perfect. Or, perfect enough.
The next obstacle I had to overcome was how to shape them to her. The videos I've watched showed heating the foam, wrapping around the limb, and securing it to cool. I didn't want to wrap hot foam around Skeeter's leg, so I looked around the house until I found something I thought would work.
Turns out a spray can of Lysol was just about the right size. I heated up the foam and wrapped it around the Lysol until it cooled. My first attempt didn't go so well; I'm guessing that I didn't heat the foam enough. My second attempt was slightly better, but then the painter's tape didn't want to stick to the warm foam. Back to the drawing board. As I was looking around for something to wrap around the foam, I remembered I had a roll of vet wrap. Yay! Problem solved!
While the leather dried, I patterned and cut the armor layers.
Once I was satisfied with them, I painted them. While the paint was drying, I glued the leather to the bases. Turns out that I didn't quite get my bases rolled square, so each one has one edge that higher than the other. Rather than messing with them again, I decided that I'd just use the higher side to determine which leg it would go on. The higher side would go on the outside of the leg for more protection. You might call it lazy to not start over, I call it, well, lazy.
 |
| The lopsidedness is not visible in the picture, but it exists. |
With the layers painted and dried, I set about riveting them together. I thought it would make it easier to glue them onto the base as one unit.
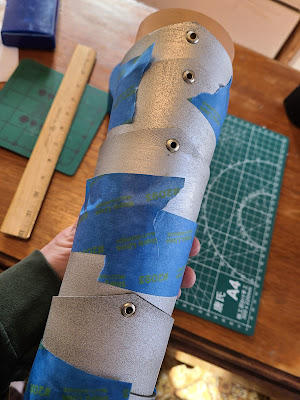
It was a good thought to rivet them all together first. It was wrong, and I'm very thankful Jay was home to give me an extra set of hands, but it was a good thought. Sometimes I just have to learn the hard way. With minimal (for me) cussing, we were able to wrap the layers around the base. You know that vet wrap that came in so handy earlier? Yeah, that stuff? I stupidly threw it away after I glued the leather to the base. So back to the painter's tape we went.
This time, I didn't wrap them around the Lysol can, I just trusted the formed base and leather would help it hold it shape, which it did for the most part.
I think the lopsidedness is a bit more apparent here, but you have to look for it. I had to do some trimming with the craft knife on the sides, because I didn't cut the layers quite as long as I should have, but I was trying to use up left-over foam. Since what I had to trim off is on the back side, no one will notice and I don't want them to wrap completely around her lower leg anyway.
Next, now that all of the barding is made, we have to battle wear it. I'm not going to lie - I like the look of pristine armor, but that isn't the point, so I'm going to take a deep breath and have Jay help me with the next step.


1 comment:
Looking good! You need to put yourself up for hire with the movie studios!
Post a Comment