Saturday, March 13, 2021

Chanfron completion

 (Alternatively, as complete as I'm willing to share until the photoshoot. Unless I change my mind.)

The black biothane bridle and reins I ordered from Chick's Saddlery arrived within a week and I couldn't wait to get it on Skeets. I considered borrowing or buying a new snaffle and scissor clips for the reins so I wouldn't have to swap back and forth. Then I decided to just make the swap; she can ride in her black costume set up between now and July.


That mare of mine. She can be such a turd, but she can also be so patient. I'd adjusted the cheekpieces longer than I thought she'd need so that I wouldn't be yanking on her mouth if I'd made them too short. I slipped the bit in her mouth and pulled the crown over her ears while I held the bit steady. I realized then that I'd adjusted the cheek pieces way, way too long and when I slipped the crown up over her head I'd also slipped the brow band behind her ears.

Y'all, have you ever felt your horse roll their eyes at you?

It only took a few minutes to get her bridle adjusted properly and she stood like a champ the whole time. I'm not thrilled with the throat latch, but it could be because I have the headstall over her halter. Or, it could be that it's a stupid throat latch and I'll just have to deal with it.

I couldn't quite figure out how I was going to mold the chanfron to fit her face. I had a vague idea of making markings where it needed to bend and trying to remember how much it needed to bend. I was willing to give it a go. But then my brilliant husband just said, "why don't you use some of the wire we bought to form her wings?"

I'm glad I've got him to come up with simple solutions. I cut a couple of pieces of wire, taped it to the chanfron, and put the whole thing on Skeets' face to bend the wire to fit.


I didn't attach the chanfron to her bridle at all, just bent the wires until they held it on her face. She was a rock star. Just between us, I think she likes playing dress up.

Once I had it fitted to her, I took it in the house and hit it with the heat gun. Since I didn't want the nose portion to bend, I was careful to only heat the top part. 

I'd used 2mm foam to cut out the layers of armor, taped those to the wire and base, and heated them up to form them as well. Having used the wire to mold the base made it easy to use it again to mold the layers.


You can see that not everything lines up correctly, but I have a craft knife that'll fix that right up. :) I swerved away from the original reference picture when it came to putting it together. I figured (I don't know for a fact, so this might just be GunDiva lore) that armor would be layered over leather because the metal would rub the horses raw. With that piece of GunDiva lore in my head, I decided to add a piece of leather instead of going full metal.

Hobby Lobby had a roll of crafting leather that I picked up for about $20. I cut it out, smeared it and the base with tacky glue and stuck it on.


My original template out of the white foam didn't have side pieces long enough to reach the cheek pieces of the bridle, so I extended my base and covered the side pieces with leather as well.

I played around with the idea of simulating rivets by indenting the foam and painting them on, then I remembered I own stuff to do rivets from my scrapbooking days, so I dug out my old punch and bought some more rivets from Hobby Lobby and went about linking the layered pieces together before gluing them to the base.


Even though I'd formed the 2mm foam to the base, as soon as I painted it, it flattened out. It turned out not to be a problem, as it is still flexible enough to bend around the base. When I move onto doing her leg guards, I won't bother molding the 2mm for those. I know I can just glue them on and they'll take on the shape of the base.

The (mostly) finished project makes me all sorts of giddy. When I started this project, I wasn't sure how I was going to do it, but I'm so excited about it now!

Looks heavy, doesn't it? It weighs in a 1.5 ounces!

There are a few finishing touches that need to be done: Jay is going to help me weather the armor to give it a battle worn look, and I'm going to add velcro dots to the bridle attachment points. The black bridle I purchased will be primarily her "costume" bridle, so I don't mind permanently attaching velcro dots to it. Having those dots will make it easier for us to switch back and forth between a Skeeter-sus and a War Horse.

My goal is to have all of her armor complete by the end of this month, and I can spend April working on her Skeeter-sus wings. May will be time for me to start my own costumes, which will take a while.

Monday, March 1, 2021

Chanfron, Part 2

I ordered a roll of packing foam to make Skeeter's Pegasus wings, but when it arrived, it wasn't quite right so I set it aside thinking I could use it for something else.

It sat in the mud room for a week or so, and I was getting itchy to work on Skeets' chanfron, but didn't have a piece of foam big enough. Then I remembered the roll I had set aside. Perfect!

I pulled it out, cut off a hunk, and then cut out the pattern. 

Because I'm impatient and I wanted to see if I came even remotely close to getting the pattern to fit her, I headed out to the pen on Monday (Feb 23) with the template tucked into my coat. Even though it was cold and windy, she was pretty happy to be pulled from the pen. She was less happy when I attempted to slip her bridle on. She allowed one ear, and then said nope to the other ear. That's a super rare thing for her, so I took the bridle off and gave her some scratches. When I put it on the second time, she was her normal self. I think she's a bit like me in that she doesn't like to immediately go to work. She wants a little 'settle in' time, which is fair. It was rude of me to pull her from the pen, then just stick the bit in her mouth without so much as a hello scratch.

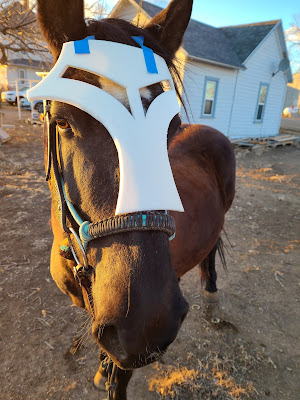
I let her sniff the template and rubbed her face with it, then slipped it up her face into position. I tried to use painter's tape to attach it to her bridle, but with the wind her forelock kept getting stuck, so I just ran the painter's tape onto her forehead. Silly girl just let me do it, too.


I was worried that it was going to come too low on her brow, but it looks like it's going to clear her eyes nicely. I needed to extend the side pieces another couple of inches so I can attach it to the cheek pieces of the bridle. Otherwise, though, I'm very excited about how close I got to a good fit just from using her bridle and reference pictures.

I decided, after looking at the pictures, that her current bridle is a bit to 'blingy' for her costume. At one point, she had a black bridle that Mom and Bill gave her, but she broke it a couple of years ago. After talking to Mom, I hopped online to see if I could find a cheap black headstall to use for her costume. Chick's Saddlery had a plain black synthetic headstall and reins for a very reasonable price, so I placed an order. 

Yesterday, I made time to sit down and really work on her chanfron. There was a lot of brain twisting to wrap my head around how I was going to make the patterns for the layered pieces of armor, but it finally started coming together in my mind.

Even though I have the giant piece of foam that I made the template from, it's low-density foam and pretty floppy, so I glued two pieces of my 6mm high-density foam together to make a piece big enough for the base of her chanfron.


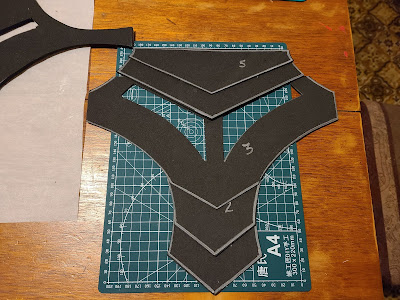
I drew out each layered piece on a piece of folded-over paper and cut them out to see if what I was envisioning would work.


I extended the side pieces on the base and hope that they'll be long enough to reach the cheek pieces of the bridle. If not, I have materials to make a strap long enough to reach. I screwed up when I glued this, though, and didn't let the glue dry long enough before I stuck the pieces together and they ended up coming apart.

It actually worked out for the better because I realized that one side didn't quite match the other, so it gave me a chance to re-draw my outline and 'fix' the bad side. It also made it easier to cut out each side instead of working with one big piece of foam. When I went to re-glue the pieces together, I (not-so)patiently waited a full ten minutes of dry time before I stuck them together.


While the base piece's glue was curing, I laid out the pattern pieces on a 11"x14" piece of 2mm foam and got to cutting.


I'm pleased with they way it's turning out so far. I'm kind of at a stand-still until her new bridle comes. I need to shape the base piece to her head, but can't do that until I have a bridle to attach it to. Once the base piece is shaped to her face, then I can move forward with priming and painting all the pieces and then I can assemble it. I'm incredibly excited to get this on her for a preview.


There will still be some cutting and fine-tuning that needs to be done once it's assembled, but I think it's going to look awesome.